These Fruity Pebbles Cheesecake Tacos are a playful no-bake dessert that turns colorful cereal into crispy taco shells filled with smooth, vanilla cheesecake cream. They’re bright, crunchy, creamy, and guaranteed to bring smiles to kids and adults alike. Perfect for parties, birthdays, or whenever you want a fun and creative treat without turning on the oven.
Why You’ll Love This Recipe
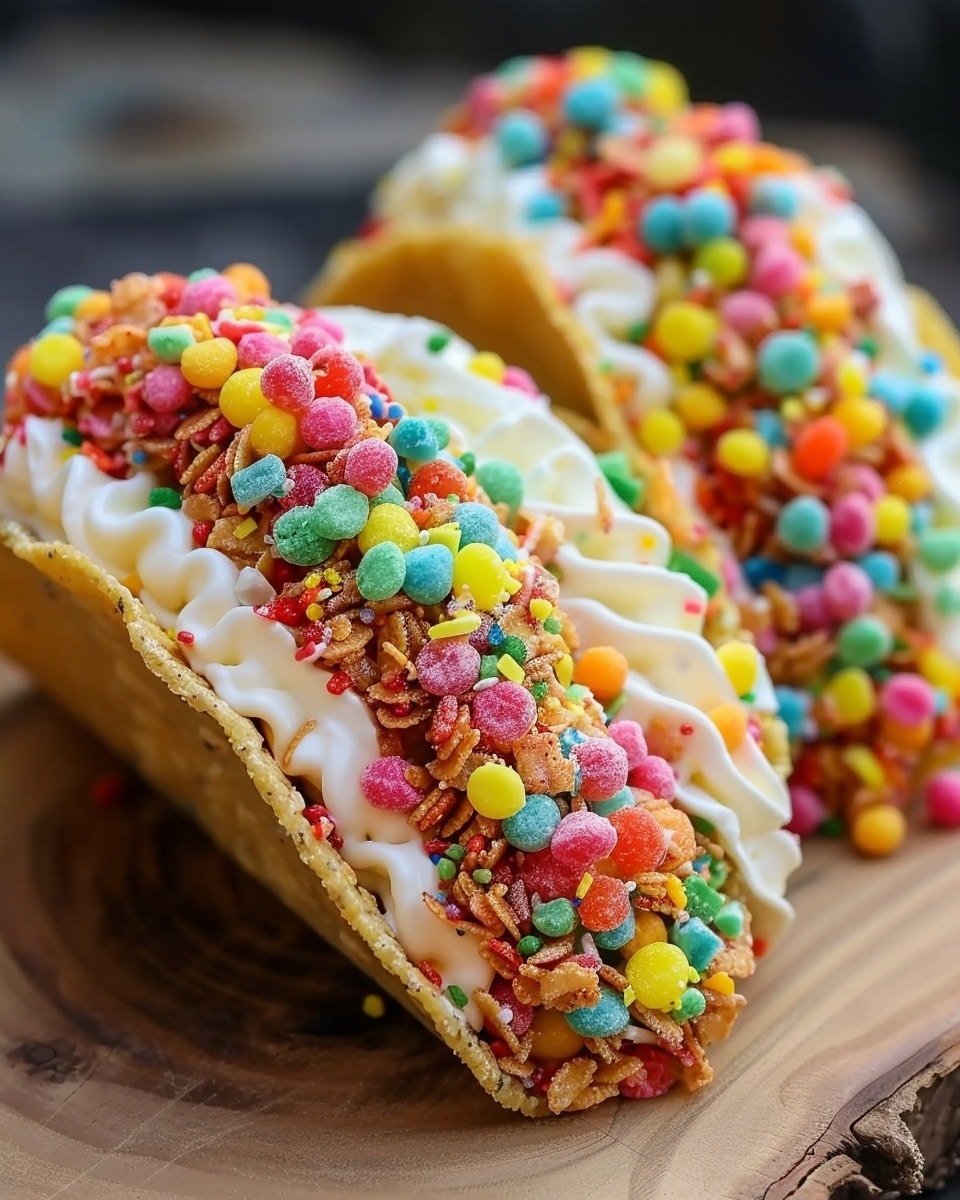
Instagram-worthy presentation
The vibrant cereal shells and fluffy white filling create a stunning, eye-catching dessert that stands out on any table.
No-bake convenience
There’s no oven required. Just mix, shape, chill, and fill. It’s ideal for warm days or when you need a quick dessert.
Kid-friendly and crowd-pleasing
The familiar fruity cereal flavor combined with creamy cheesecake makes this a guaranteed hit with all ages.
Make-ahead flexibility
You can prepare the shells and filling in advance, then assemble shortly before serving for best texture.
Beginner-friendly
Simple ingredients and easy steps make this recipe perfect even if you don’t have much baking experience.
Ingredients
(Tip: You’ll find the full list of ingredients and measurements in the recipe card below.)
Cereal Shells
3 cups colorful fruity cereal (such as Fruity Pebbles)
1/2 cup unsalted butter, melted
Cheesecake Filling
8 oz cream cheese, softened to room temperature
1/2 cup powdered sugar, sifted
1 teaspoon pure vanilla extract
1 cup whipped cream
Garnish
1/2 cup additional fruity cereal for topping
Directions
Prepare the cereal mixture
Place the 3 cups of fruity cereal in a large mixing bowl. Pour the 1/2 cup melted butter over the cereal. Stir gently but thoroughly until all the cereal pieces are evenly coated. The butter should be warm, not hot.
Shape the taco shells
Press the buttered cereal mixture firmly into taco-shaped molds or into the curved sections of a muffin tin to form taco shells. Aim for about 1/4 inch thickness. Compact the mixture well so the shells hold their shape.
Chill the shells
Place the shaped shells in the refrigerator for at least 30 minutes, or until completely firm. This allows the butter to solidify and bind everything together.
Make the cheesecake filling
In a large bowl, beat the softened cream cheese with an electric mixer for about 2 minutes until smooth and fluffy. Gradually add the powdered sugar and vanilla extract while continuing to mix. Scrape down the sides of the bowl to ensure a lump-free texture.
Fold in the whipped cream
Using a rubber spatula, gently fold the whipped cream into the cream cheese mixture. Use light, slow motions to keep the filling airy and fluffy. Do not overmix.
Assemble the tacos
Carefully remove the chilled shells from their molds. Spoon or pipe the cheesecake filling generously into each shell, slightly overfilling for a beautiful presentation.
Garnish and serve
Sprinkle additional fruity cereal on top of each taco. Serve immediately for maximum crunch, or chill for up to 2 hours before serving.
Servings and timing
Servings: 12 taco treats
Preparation time: 45 minutes
Chilling time: 30 minutes
Total time: Approximately 45 minutes plus chilling
Skill level: Beginner-friendly
Cuisine type: American
Dietary option: Vegetarian
Variations
Chocolate version
Use chocolate-flavored cereal for the shells and add 2 tablespoons cocoa powder to the cheesecake filling.
Cinnamon twist
Replace the fruity cereal with cinnamon cereal for a warm, spiced flavor profile.
Strawberry cheesecake tacos
Add 1/4 cup finely chopped fresh strawberries to the filling for a fruity upgrade.
Mini party bites
Use smaller molds to create bite-sized taco shells perfect for dessert tables and events.
Colorful filling
Divide the cheesecake mixture and tint with food coloring to match or contrast the cereal shells.
Storage/Reheating
Storage
Store unfilled cereal shells in an airtight container at room temperature for up to 2 days.
Store the cheesecake filling in a sealed container in the refrigerator for up to 24 hours.
After assembly, refrigerate the tacos and consume within 4 hours for best texture. The shells may soften over time due to the moisture in the filling.
Reheating
This is a no-bake dessert and does not require reheating. Serve chilled or slightly cool for the best flavor and texture.
FAQs
Can I make the shells a day in advance?
Yes, you can prepare the shells up to 2 days ahead and store them in an airtight container at room temperature.
How do I prevent the shells from breaking?
Press the cereal mixture firmly and evenly into the molds, and allow enough chilling time so they become fully set before removing.
Can I use store-bought whipped cream?
Yes, store-bought whipped cream works well. Make sure it is stable enough to fold into the cream cheese mixture.
What if I don’t have taco molds?
You can use the curved sections of a muffin tin or shape them over the back of a spoon lined with parchment paper.
Can I freeze these tacos?
Freezing is not recommended, as the texture of the filling may change and the cereal shells can become soggy when thawed.
How long can the assembled tacos sit out?
They can sit at room temperature for about 1 hour. After that, refrigerate to keep the filling fresh.
Can I reduce the sweetness?
Yes, you can reduce the powdered sugar to 1/3 cup if you prefer a less sweet filling.
Why is my filling lumpy?
This usually happens if the cream cheese was not fully softened. Always bring it to room temperature before mixing.
Can I add fruit inside the filling?
Yes, finely chopped strawberries or blueberries can be folded in gently for extra flavor and texture.
Are these suitable for birthday parties?
Absolutely. Their bright colors and individual portions make them perfect for birthdays and celebrations.
Conclusion
Fruity Pebbles Cheesecake Tacos are a creative, no-bake dessert that combines crunchy cereal shells with smooth, fluffy cheesecake filling. They’re easy to make, visually stunning, and guaranteed to impress guests of all ages. Whether you’re hosting a party or simply want a fun treat to brighten your day, these colorful dessert tacos deliver joy in every bite.
Fruity Pebbles Cheesecake Tacos are a colorful, no-bake dessert featuring crispy cereal taco shells filled with a creamy vanilla cheesecake mixture. They’re fun, eye-catching, and perfect for parties or easy make-ahead treats.
Author:Sophia
Prep Time:15 minutes
Cook Time:0 minutes
Total Time:45 minutes
Yield:12 tacos
Category:Dessert
Method:No-Bake
Cuisine:American
Diet:Vegetarian
Ingredients
3 cups fruity cereal (such as Fruity Pebbles)
1/2 cup unsalted butter, melted
8 oz cream cheese, softened
1/2 cup powdered sugar, sifted
1 teaspoon vanilla extract
1 cup whipped cream
1/2 cup additional fruity cereal (for garnish)
Instructions
In a large bowl, mix fruity cereal with melted butter until fully coated.
Press the mixture into taco-shaped molds or muffin tin curves, forming 1/4-inch thick shells.
Chill shells in the refrigerator for at least 30 minutes until firm.
In a mixing bowl, beat softened cream cheese until smooth and fluffy.
Add powdered sugar and vanilla extract; beat until combined.
Gently fold in whipped cream until fluffy. Do not overmix.
Carefully remove taco shells from molds. Fill each shell with the cheesecake mixture using a spoon or piping bag.
Sprinkle additional fruity cereal on top and serve immediately or refrigerate up to 2 hours before serving.
Notes
Press the cereal mixture firmly for sturdy shells.
Soften cream cheese fully to avoid lumps in the filling.
Serve shortly after assembling to preserve the crunch.


