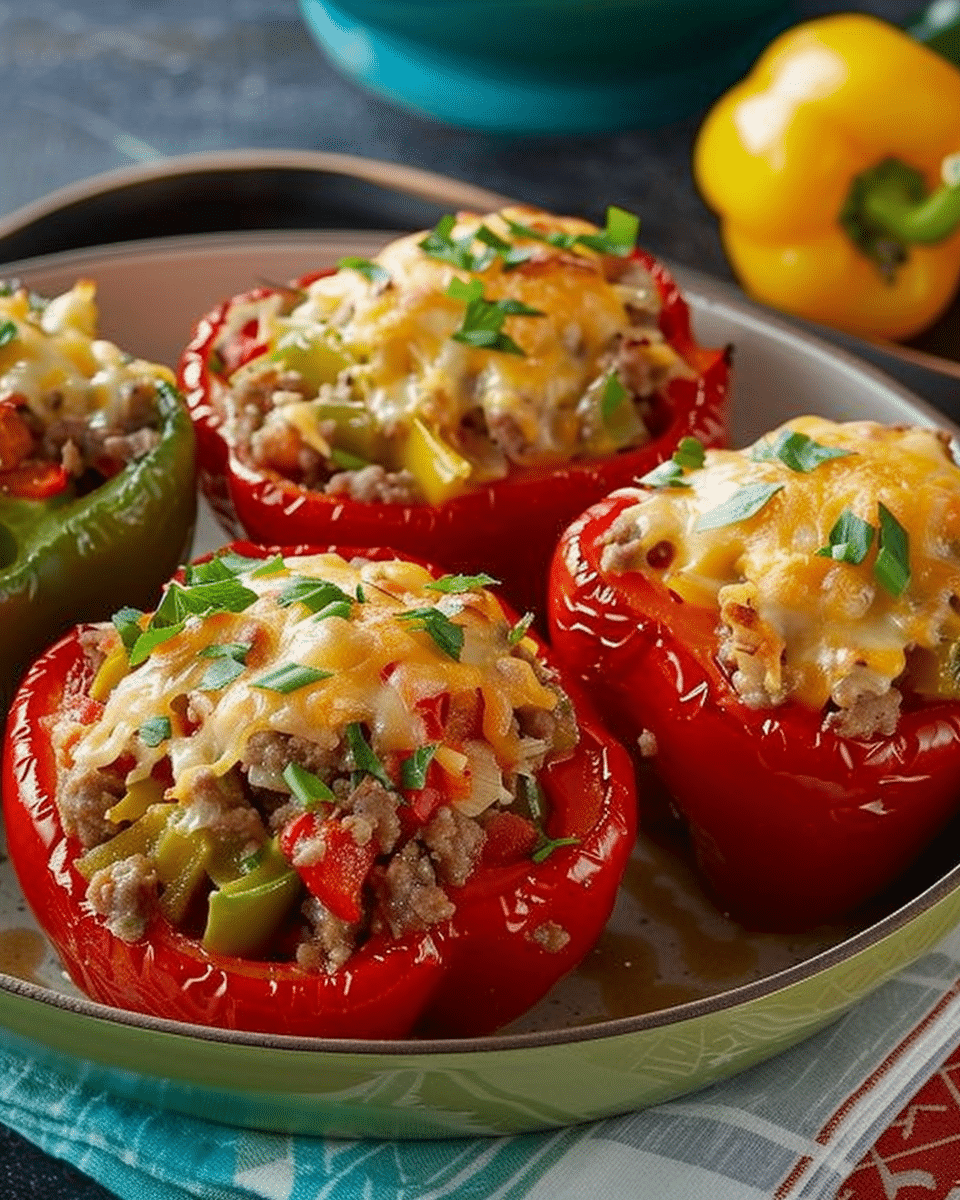
A hearty and comforting all-in-one meal featuring bell peppers filled with beef, rice, vegetables, and melted pepper jack cheese—a weeknight favorite that’s easy to prepare ahead and bake when needed.
Why You’ll Love This Recipe
These stuffed bell peppers are not only mouthwatering and visually appealing, but they also offer a healthy, customizable meal that’s both satisfying and practical. You can prep components ahead of time, simplifying busy weeknight dinners.
Ingredients
(Tip: You’ll find the full list of ingredients and measurements in the recipe card below.)
-
6 whole bell peppers (or 8 if you prefer smaller stuffing)
-
3 tablespoons olive oil, divided
-
8 ounces lean ground beef
-
Salt and pepper, to taste
-
1 medium onion, chopped
-
3 cloves garlic, finely chopped
-
1 large zucchini, diced
-
4 Roma tomatoes, diced
-
1 cup cooked rice (white or brown mix works fine)
-
2 cups shredded pepper jack cheese, divided
Directions
-
Cut the tops off the peppers, remove stems and seeds, finely chop the tops, and set aside.
-
In a skillet over medium-high heat, heat 2 tablespoons olive oil. Cook the ground beef with salt and pepper until browned, then remove to a plate.
-
Add the remaining olive oil to the pan, sauté onion and chopped pepper tops for 3–4 minutes. Add garlic and zucchini, cooking for another minute. Stir in tomatoes, season, then mix in beef and rice. Taste and adjust seasoning. Stir in 1½ cups of the cheese. Let the mixture cool.
-
When ready to bake, preheat oven to 350°F. Place peppers cut-side up in a baking dish. Stuff each with the beef-rice filling and top with the remaining ½ cup cheese. Pour a small amount of water into the dish, cover with foil, and bake for 30 minutes. Uncover and bake an additional 15–20 minutes until the peppers are soft and the cheese is lightly browned. Serve hot.
Servings And Timing
-
Yield: 6 very stuffed peppers (or up to 8 if filled more lightly)
-
Prep time: 15 minutes
-
Cook time: 1 hour
-
Total time: 1 hour 15 minutes
Variations
-
Try ground turkey or sausage instead of beef for a different flavor.
-
Swap pepper jack for cheddar, mozzarella, or feta.
-
Use brown rice, quinoa, or cauliflower rice for variations in texture.
-
Add herbs like basil or spices like chili flakes for extra kick.
Storage/Reheating
-
Store leftovers in an airtight container in the fridge for up to 3 days.
-
Reheat in the oven or microwave until heated through.
-
Freeze baked peppers in an airtight container for up to 3 months; reheat directly from frozen in the oven.
FAQs
1. Can I make these ahead of time?
Yes—you can prep the peppers, filling, and cheese separately and store in the fridge. Assemble and bake when ready.
2. Do I need to pre-cook the peppers?
No—the peppers bake long enough in the oven to soften perfectly without pre-cooking.
3. Can I use a mix of meats?
Absolutely—ground beef, turkey, or sausage all work wonderfully.
4. What if I don’t have pepper jack cheese?
You can use cheddar, mozzarella, feta, or any cheese that melts well.
5. Can I use raw rice instead of cooked?
Cooking the rice separately ensures the right texture—raw rice may not cook evenly.
6. How spicy is this recipe?
It’s mildly spicy from the pepper jack cheese, but you can adjust heat levels with your cheese choice.
7. Can I freeze them?
Yes—bake, cool completely, then freeze. Reheat from frozen in the oven.
8. What side dishes pair well?
A fresh salad, garlic bread, or roasted vegetables complement these peppers perfectly.
9. Can I make it vegetarian?
Yes—swap the meat for beans, lentils, mushrooms, or crumbled tofu.
10. Does the recipe require special equipment?
Just basic kitchen tools and an oven—nothing fancy needed.
Conclusion
These stuffed bell peppers strike the perfect balance between flavor, convenience, and comfort. With a delicious beef-veggie-rice filling, melty cheese, and easy prep, they’re a go-to recipe for busy nights, meal prep, or casual entertaining.
Stuffed Bell Peppers
5 Stars 4 Stars 3 Stars 2 Stars 1 Star
No reviews
Hearty bell peppers stuffed with a savory mixture of ground beef, rice, vegetables, and melted pepper jack cheese, baked to tender perfection for an easy, comforting all-in-one meal.
- Author: Sophia
- Prep Time: 15 minutes
- Cook Time: 1 hour
- Total Time: 1 hour 15 minutes
- Yield: 6 stuffed peppers (or 8 smaller ones)
- Category: Main Course
- Method: Baking
- Cuisine: American
- Diet: Halal
Ingredients
6 whole bell peppers (or 8 if smaller)
3 tablespoons olive oil, divided
8 ounces lean ground beef
Salt and pepper, to taste
1 medium onion, chopped
3 cloves garlic, finely chopped
1 large zucchini, diced
4 Roma tomatoes, diced
1 cup cooked rice (white or brown mix)
2 cups shredded pepper jack cheese, divided
Instructions
- Cut tops off peppers, remove stems and seeds, finely chop the tops, and set aside.
- Heat 2 tablespoons olive oil in a skillet over medium-high heat. Brown ground beef with salt and pepper; remove and set aside.
- Add remaining olive oil to pan; sauté onion and chopped pepper tops for 3–4 minutes.
- Add garlic and zucchini; cook 1 more minute.
- Stir in tomatoes, season with salt and pepper, then add beef and rice. Adjust seasoning and stir in 1½ cups cheese. Cool mixture.
- Preheat oven to 350°F (175°C). Place peppers cut-side up in a baking dish.
- Stuff each pepper with filling and top with remaining ½ cup cheese.
- Pour a little water into dish, cover with foil, and bake 30 minutes.
- Uncover and bake 15–20 minutes more until peppers are soft and cheese is browned.
- Serve hot.
Notes
- Substitute ground turkey or sausage for beef.
- Try cheddar, mozzarella, or feta instead of pepper jack cheese.
- Use brown rice, quinoa, or cauliflower rice for different textures.
- Add herbs like basil or spices such as chili flakes for extra flavor.
- Pre-cooking peppers is not necessary.
Nutrition
- Serving Size: 1 stuffed pepper
- Calories: 350
- Sugar: 6g
- Sodium: 450mg
- Fat: 18g
- Saturated Fat: 8g
- Unsaturated Fat: 7g
- Trans Fat: 0g
- Carbohydrates: 25g
- Fiber: 4g
- Protein: 22g
- Cholesterol: 75mg


